Wednesday, March 23, 2011

BrickWalla - Fantastic 240 Blog from Malaysia!

Please visit this BrickWalla blog on 240, also from Malaysia. Proud to share with you guys the fantastic page from my Malaysian, Volvo blogger friend.


Good Day!

Thursday, February 03, 2011

Another Major Service Done!

Last service was done on June 2010! And the mileage covered from then is just 5,000km. Have it serviced with some parts changed;

a) As usual, get the engine oil and filter changed. Using semi-synthetic oil, original oil filter. This workshop always practice changing the drain plug gasket and engine oil cap rubber seal on each service.

b) Both LHS and RHS wishbone bush have cracked. Changed both. Changing wishbone bush requires hydraulic pressing on it and usually performed at certain workshops who have the facility to push in the bush. Some mechanic even tack weld at the edge of the wishbone bush metal to secure it.

c) LHS ball joint worn out. Tyre loose out under 'grip & shake' test. New Lamforder ball joint installed.


d) Long shaft or the propeller flex disc coupling was also cracked. Get it changed as well. This part is vital as it connect the output shaft of the gearbox to the propeller shaft. It ensure your car move nice!


Good Day all!

PDF Books

If you are looking for PDF resources on our Volvos, I would recommend below pages;

For owners manual copy, in case if you bought a second hand Volvo without these copies, you can always download it direct from Volvo Cars. This copies are essential for every owners, stating operating manual and service intervals checklist as well. Follow below link;
For Volvo repair manuals or we call it as Volvo Green Book, our friend in k-jet.org have a lot of them. Follow his link below;
If in case you require specific pdf books on Volvo, I do also have some. Just email me at [ahmadzhafri at gmail dot com]

Good Day!

Solution for Tickering Speedometer

Hi readers. As I have posted earlier on my speedometer problem, have get my local mechanic here to troubleshoot and fix it for me. It was the rear speedometer sensor wire located at the rear axle which was the culprit. The wires have torn a little bit, however being covered with road grimes. The mechanic clean it up to reveal some part of the wires have worn out.

this is the problem...

old slight worn wire
Very simple fix, rewiring from the socket to the point where it enters rear boot. Done and the meter works perfectly now!

rewired

Sunday, January 16, 2011

Solex Cisac Idle Air Compensation

The B230K engine well fitted with Solex Cisac carburetor. This 'modern' caburetor is well equipped more with pneumatics equipment. One of them is the idle air compensator unit mounted, which work based on pneumatic air/vacuum. The working principle is very simple, at the same time air-cond compressors engaged, a pneumatic valve mounted on firewall will be activated. It simply sucks air in, connected to the idle air compensator on the carburetor. The unit then through its' 'handle' throttles up the car. This balances idling speed both with and without air-cond.

labelled #94

And for me, the unit had broken. The car idle speed drops once air-cond is switched on. Yeah, not so big deal because most of the time the car is in higher speed cruise. The unit have become to 'extinction', very difficult to get a new one. A friend of mine is selling his used unit of Solex Cisac carburetor of same specification. I bought it and swapped the idle air compensator unit!

NEW on left, OLD on right


Note the location of the unit. There are one vacuum line fitted with 2 torx mounting screws. Detached the old unit and swap in new unit, very simple. For me I need to adjust the compensator screw to move the 'handle' further in before it could throttle up. Once installed, you need to start the engine to its operating temperature, turn on the air-cond. Observe that when air-cond compressor is engaged, the compensator 'handle' must move in. To adjust the movement so that it meets same idle rpm, you have to turn an adjustment screw located at the back of the unit. Turn counter clockwise to move in the 'handle' and vice versa until desired rpm achieved. Mine is set around 900rpm.

to move-in the 'handle'

turn counter clockwise       

Monday, January 03, 2011

Grab This CR-712!

Hi. As I have installed new stereo unit, I am letting go this CR-712 head unit, ship internationally. This is originally taken from an 88' Volvo 240, which I have then used for my 940. This unit does not require code activation. The display screen, buttons, AM/FM, and cassette player are still functioning.  You can read my earlier posts on this unit through below links;

http://vol240.blogspot.com/2010/01/cr-712-have-no-code.html


http://vol940.blogspot.com/2010/05/cr-712-installed-in-940.html


 Just follow below link to eBay and purchase it there.

http://cgi.ebay.com.my/ws/eBayISAPI.dll?ViewItem&item=280611188687

Sunday, November 28, 2010

My VolStall Buyers!

Hi all, especially to My VolStall buyers! First and foremost, I would like to express thousands apologies as I beleived the form is currently having some bugs. I do received your enquiries, however when I reply to your email address as entered in the form, the email bounced back. Only few people get the message while the rest dont.

If you are one of them who's still waiting for my reply, kindly drop me a direct email at ahmadzhafri@gmail.com

Sorry for inconveniences caused, let me fix the bugs in the meantime.

Good Day all!

Monday, September 27, 2010

Acting Up...Phew

Finally the speedometer of this 1989 Volvo started to acting-up. I was cruising at a speed of 80km/h while recording this erractic needle jumps. Will update you guys once solved.

My initial thought to check;

1) The speed sensor socket at rear axle have come loose/wires cracked and touching each other. Yesterday I have a look at them and they looks fine with thick road grimes coverings. Will use multimeter to measure at the instrument board socket, if the multimeter jumps here and there as well, most probably will be wiring issues; if not

2) The instrument board/circuit issue. Have to investigate further.


Wish me luck!

Wednesday, September 01, 2010

Exhaust Restored

Hi Guys!

Just got the exhaust system repaired (replaced actually). Exhaust system for this B230K have few components, let us check it briefly.

From engine exhaust manifold, there are 2 to 1 exhaust pipe, straight to a muffler situated under rear passenger's floor board. The muffler then connected to a 'bending' pipe which cross above rear axle and beside suspension spring to a second muffler located just under the rear bumper. And finally a tail pipe out from the second muffler to the air!

In my case, the exhaust problem was obvious, when the car sounded like a motorboat engine! It was out loud! Checked to a local exhaust specialist here, and both front and rear exhaust pipe had cracked and leaked gases out. The same goes to the first muffler which had cracked. Got them replaced.

FYI the exhaust pipes had never been changed since 'from factory' almost 21 years ago. And now only the rear muffler and its tail pipe is still sustaining the 'from factory' status!

Good day all!

Saturday, June 05, 2010

Latest Pictures

Hi guys. Enjoy the after new coat pictures. Pictures says thousands words, so do enjoy :)

CLICK ON THE PICTURES FOR BIGGER VIEW


Tuesday, June 01, 2010

New Paint Job

Hi all! Wow, it has been quite some time ago since my last post here; yeah nothing much to update on the car, everything was fine with it & as I'm busy with my 940 restoration project, nothing much to write here. By the way, the car has got new coat of paint, the same color, both exterior, interior under the hood plus undercoat for undercarriage.

The job took approximately 3 weeks to finish. The old ugly paint were sand-off, all dents were straightened, scratched bumpers touched-up, rusted floor board re-weld using arc-weld, and the undercarriage is then coated with the black tar type coat (it really makes the car look brand new!).

The workshop had done a good job on painting, especially under the engine hoot and rear boot, it makes the car looks really as brand new, with black finishing on door window's panel. BUT one 'unfavorable' things had happened on the day I took the car out of the workshop. Before payment made, I made a visual inspection around the car, focusing more on engine bay to ensure everything is in-tact as before and as it should be, no wiring damaged, no screws missing, and yeah fully satisfied. Pay, take receipt, adn drove off from the workshop. Just about 2km, the temperature gauge shoots up high quickly. Fortunately there's a petrol station by the side which I then pull off, park there, shut off the engine. Guess what?? NO RADIATOR WATER AT ALL!! Beleive the workshop had detached the expansion tank for painting job, and did not top-up back the drained water. Just let the car cooled down for a while, topped-up with tap water (a lot!) and get started again; OK! So my inspection was not thorough enough :(

Pictures below are some shots under the engine hood, very messy! I will post pictures after I cleaned them up, it looks a lot nicer now! And as for the undercarriage, the tar coat makes the car more quiet now! Perhaps it filled up the tiny-miny spaces down there as well.


OK then, till I post the latest pictures, GOOD DAY ALL!

Saturday, March 27, 2010

Ugly Old Machine


above are BEFOREs... wait for AFTERs..

Saturday, February 27, 2010

Volvo Blind Touch


This video touched me. They are blind at eyes, but they can see through from their hearts.

Saturday, January 02, 2010

CR-712 Have No Code!

Guys, found the answer. Decided to power up the unit with 12V supply to the blue wire and ground on black wire of the unit. The unit power up and shows off immediately radio frequency and could be used without any Code message appears.


Thus, below posts on code hacking is not applicable for CR-712. Next will be installation job into my 940; another chapter of audio installation!

CLICK HERE if you need more information on CR-712 wiring/color coding. Good Day!

Thursday, December 24, 2009

CR-712 Have Security Code?


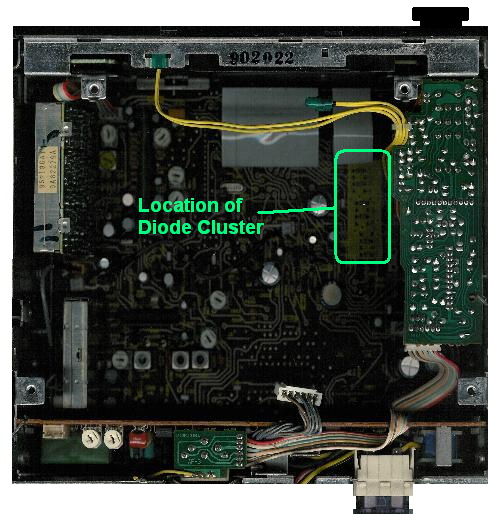
Finally the 240 stereo set arrived (another product of eBay, again). It was stamped as CR-712; I did opened up the set to look-up for the diode setup but it seems different from CR-702. So I am not so sure if the code calculator for CR-702 could be used for CR-712?


Looking forward to install the unit in the 940 and see if it request for code. Will update you guys!


p/s - does anybody know if CR-712 have security code or not? appreciate your info.. do visit my new home site (http://vol940.blogspot.com) as well!

Sunday, November 22, 2009

Classic, Nice, Cheap

Hi all. Just want to share of my rceent eBay transaction & how eBay might help us with the old Volvos. The courtesy handles on the 240 had turned yellowish, the nut cap had become brittle and dropped off; it doesn't look nice in short. I was planning to replace only the nut cover but then realized it comes per set with the handle itself.


Went over to my favorite Volvo parts dealer in Kuala Lumpur and asked them if they have any stock of the courtesy handle; none. Yeah, as expected nobody buys them, its either their handles are still in mint condition or its just an old car so why bother on the handle? But they offer to order them if I really want the handles and quoted around RM200 per piece, thats mean total of RM600 to get the three handles replaced. Then I just say, never mind.


Went home and share the story with my dad. He said "pergilah tengok dalam Internet" (why don't you go and have a look on the net). Yeah, surfed eBay and I found the handles! To cut it short, succesfully bought 3 pieces of them with total price of RM150 only including courier charges! The seller who is from USA told me that they are used ones, but when the parcel arrived, they look-like a brand new handle! Perhaps USA climate is too gentle to plastics as compared to Malaysia hot tropical climate.


Changed them, now it look nice. A classic car, with nice handle, and cheap!

Thursday, November 19, 2009

Volvo Radio Code

Browsing through sites, finally I found this website. I don't know if this is illegal but; who cares of this more than a decade car stereo! We often listen people who bought second hand unit of Volvo original radio unit will not be able to use them just because of difficulties in getting the radio code (its just too old and owners lost the number).

If you are among them, come and read this wonderful page. Try surfing around and you'll find Volvo Radio Code calculator. What you need to do is to follow the instruction on the website, read your diode arrangement and key-in the diode arrangement to your code calculator software; done!


Enjoy!

Friday, October 30, 2009

Now Let's Finally Fix the Odometer (cont.)

OK, let us continue from the last post. Now that we have remove the instrument cluster safely, bring it in-door, and;

[CLICK ON THE IMAGE FOR CLEARER ARROWS & CAPTIONS]

B) Fix the gear!


1) Unscrew 7 philips screw as marked on above picture. After that, you could lift the board up from the black housing. DO THIS CAREFULLY TO AVOID DAMAGE TO NEEDLES!


2) Position the board vertically. NEVER LET THE NEEDLE SURFACE DOWN/TOUCH ANYTHING. Unscrew 4 philips screw as above picture. This will enable us to take-out the speedometer/odometer assy;


3) Lift out the speedometer by putting your hands on the speedo plate and lift it out horizontally, AGAIN SLOWLY;


4) You will see this motor attached on the backside of the speedo plate. Unscrew these 2 flat type screws; after that you'll be able to lift out the brown circuit board. JUST LIFT IT OUT, DON'T DISCONNECT IT. This is enough to expose inside gears;


5) From above picture (credit to Eric's), you'll find that for odometer, there are 2 main gears; a small and a big gear. More often than not, the smaller gear is always the culprit (with missing teeth). Inspect them and replace whichever necessary.

I did changed the small gear in 2004 with a local-machined gears and it works fine still after 5 years. Just recently I found the bigger gear is the culprit. Changed it, reinstall back (reinstallation is just reverse of removal) and yeah now the odometer keep on running!

Happy trying & Good Luck!

p/s - DIY at your own risk.. this article is for info sharing and should not be liable for any 'incidents' encountered during your DIY session. good day all!